Monday, September 20, 2010

Downgrade Iphone 2g/3g from OS4.1 to 3.1.2/4.0

Apple recently released its latest iphone firmware OS 4.1 . Many of us might have accidently upgraded it and might have done intentionally because of software issues.Unfortunately if you are using iphone 3gs and do not have your SHSH blob saved on Cydia server , nothing can be done at this point of time.But if you are using iphone 2g/3g and would like to downgrade it back to previous firmwares like 3.1.2 or 4.0 , you just have to follow the steps below :

Softwares needed :

1.Apple iTunes 9.2
2.Restore firmware 3.1.2 / Restore firmware 4.0 ( Google it , you'll find it easily or go to this link : http://www.iphonedownloadblog.com/iphone-downloads/ )
3.Blackrain by Geohot ( for jailbreaking on firmware 3.1.2 - again google it )
4.Recboot ( try google god again ;) )

Installation Steps:

Step 1: First thing ( probably the most importance one ) is to first trick apple to believe that you are validating your new firmware with it since Apple doesnt allow downgrading of firmwares anymore.For this, you need add a new entry in your host file ( usually located @ C:\WINDOWS\system32\drivers\etc ).Open the file called 'hosts' using notepad and add this :
74.208.10.249 gs.apple.com. This would point the itunes validation for firmware with Saurik's cydia server and it will grant you access to firmware downgrades.


Step 2: Now open itunes and enter DFU mode. If your not sure how to enter DFU mode , check my previous post on "how to enter recovery and DFU mode". Click SHIFT + Restore button on itunes and point to the firmware you want to install.

Step 3: After the process of installing the firmware completes, you'll see an error : 1015.


This error is fine and tells that your firmware has been downgraded , it just needs to be kicked out of the recovery mode. ( If dont get any error , you can skip step 4 ).

Step 4: Download and install Recboot. Open it and click 'Exit Recovery Mode'.


Be patient and wait for sometime while your iphone is being kicked out of recovery mode. Once the process is done, you'll see the apple logo with the usb cable pointing to it with a slidebar at the bottom.

Step 5: You have now successfully downgraded to previous firmware.If you downgraded it to 3.1.2 and would like to jailbreak or unlock it for any carrier, follow step 6.

Step 6: Download BlackRain and put it in the following folder ( this will avoid the asl.dll error ).

"C:\Program Files\Common Files\Apple\Apple Application Support\blackra1n.exe"

Open blackra1n.exe and click 'make it rain'. After your phone reboots , you'll have a jailbroken phone.

Note : You would not be able to unlock your phone since with OS 4.1 , your baseband is upgraded to 5.14.02 and as of now there is no way to unlock iphone on that baseband. Keep track of Geohot's ultrasn0w 1.1-2 @ repo666.iphone.com

Friday, September 17, 2010

How to enter Recovery Mode and DFU Mode

Recovery mode : You would like enter a recovery mode if your current iphone firmware is corrupted or not running properly and you would like to restore it to the original iphone firmware or firmware greater than the current one.
( This is useful if your on AT&T and have an activated SIM . If your on jailbroken or unlocked phone, DO NOT go for this as it would wipe off your jailbroken or unlocked privileges )

DFU mode : Very similar to recovery mode but is meant for downgrading your current firmware or to install a custom firmware.

To enter a recovery mode , there are several timing techniques . The most common one is to press both Power Button + Home Button together for about 10 seconds then release the power button and keep pressing the Home Button for another 6-8 seconds. This is very easy.
( Your screen would go blank once you enter Recovery Mode )

The biggest hassle is to enter into DFU mode. You would probably end up getting in restore mode almost everytime. There are again a lot of time techniques related to it but i personally couldnt successfully test any of them frequently. Recently i came up with a solution where you dont have to keep an eye on the clock.
To enter DFU mode , all you have to do is to just keep pressing both Power Button + Home Button together. After about 15 seconds , you would see the apple logo on the screen ( do nothing but just to keep holding the 2 buttons ).After another 20 seconds , you would see the itunes logo with the USB cable on the iphone screen, release both the buttons now. Your now in DFU mode :)

Install Cydia / Rock Applications Without Wifi

Iphone/Ipod 3G/3GS has some issues where your WiFi either stops working all of a sudden or it stops displaying any available Wifi networks. And then if you want to install any app, your stuck.

But you can still download and install Cydia / Rock apps in the following ways :

The applications available on Cydia and Rock have extension ".deb". Its just like your ".exe" binary installers in windows. These .deb files are freely hosted on different sites like http://apt.saurik.com/debs/ ( Thanks to Saurik for his amazing work so far ). You can browse and download the files you want.But sometimes you might some prerequisite apps installed in order to install the application you desire. This information can be seeked out through Cyder 2.

Cyder 2 is a free application that you can install on your Windows. It can also directly install apps on your Cydia.

Once you have it, follow the step-by-step guide below:

(This guide would only help if you have a jailbroken iphone with Cydia pre-installed. If you do NOT have a Jailbroken iphone or Cydia installed on your phone , check out my upcoming post on 'Installing Cydia or Cydia Applications on Non Jailbroken iphone Without Wifi.'

Step 1: Download Cyder 2 and install it ( Search On Google ).

Step 2: Connect your iphone/ipod to your computer through the USB Cable.

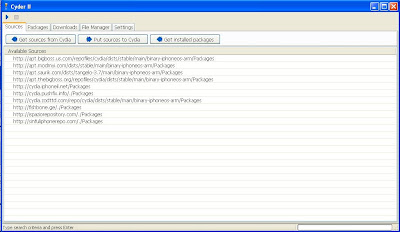
Step 3: Open Cyder 2 and go to 'Source' tab. ( Click the image to enlarge )


Click 'Get Sources from Cydia' to get all the repository urls from the Cydia installed on your iphone. You can also add repository urls to fetch the apps or add it to your Cydia by right-clicking and click 'Add' and enter the repository urls ( you can again search google to get more urls ) and then click 'Put sources to Cydia'.

Click button to validate the connectivity and validity of urls.

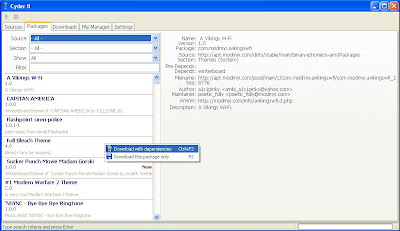
Step 4: Go to 'Packages' tab.


Choose the package/app you want to install from the drop down choices and right click on the package to bring up menu.From the menu , click 'download this package only' ( If your not sure about the pre-requisites of the package selected , click 'download with dependencies' )

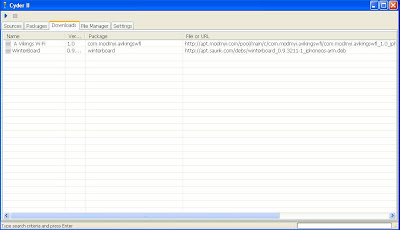
Step 5: Click on 'Downloads' tab


Click button to start downloading. If the download is unsuccessful , you'll see . If its successful , skip Step6.

(Note: If you want install rock apps .deb , follow step6 )

Step 6: If your download is unsuccessful, it could be either because of network firewall connection issues or either because the file does not exist on the server. To validate if the file exists and to bypass firewall connection , type or browse the url in your browser mentioned in 'File and Url' section.If the file exists, you'll get a download dialog box.Save the file/s inside the 'Achives' folder in your Cyder installation folder.

You can also browse different .deb for ROCK App on different repository urls.

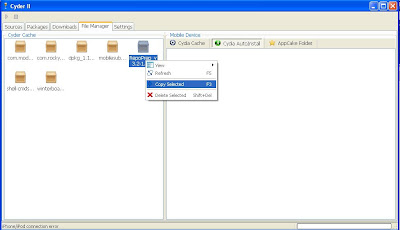
Step 7: Click on 'File Manager' tab.


You'll see the packages that you downloaded from Step5 or Step6 ( under Cyder/Archive/ ). Now from the right menu , select 'Cydia Autoinstall' tab and select all or individual package from the left menu and right click to get 'Copy Selected' option. This would copy all/selected package to Cydia's AutoInstall folder ( usually located at iPhone/Root Directory/var/root/Media/Cydia/ ).

Step 8: You can now quit Cyder and open the Cydia on your iphone. Now close Cydia and restart your iphone.

Step 9: When the iphone boots up, you should be able to see the application installed on your iphone.


I hope this would solve the problem of those people who lost or doesnt have wifi access.

Let me know if you have any questions or problems regarding this. I'll be more than happy to help !!

Cheers ..
Dino.